I've been able to do a lot of things with my graphic design which I'll be sharing both here and on my design blog. First up is a rewind to last summer (yes, summer 2011) to catch up on all of the fun, parties, and events we were a part of. I've been editing and cataloging hundreds of pictures, some of which include tutorials and how-tos, so I hope it'll be fun and helpful for you, too!
--------------------------------------------------------
Rewind: Carnival Quinceañera, Part 1
July 1, 2011
First in the series is my sister Ruth's awesome Carnival-themed Quinceañera. A Quinceañera is a traditional coming-of-age party mostly celebrated in Latin and Catholic cultures when a young woman turns fifteen. We're not Catholic, but we do love parties! My sister turned fifteen last year and decided to put a twist on the traditional Quinceañera (which seriously, can be like a mini-wedding--fancy white dress, big salon, delicious food, expensive tableware--and sometimes ends up costing as much as one!) and instead played up her creative personality and planned a Carnival Quinceañera. We were living with my parents at the time, so I got to be a part of the planning process. It was so fun finally putting to use some iconic party ideas floating around the web like striped straws, little paper flag cupcake-toppers and a candy bar. I will share all of the decorations we made first, and in the next post I'll share some pictures of the event. Enjoy!
My lovely sister, Ruth Airi Zurcher.
The "Welcome to the Carnival" signs were made of printed cardstock mounted on cardboard and taped to a wooden rectangle we found in the backyard, painted white. I designed the signs in Adobe Illustrator. I have the files, if anyone would like to use them.
The cupcake flags were made of scrapbook paper triangles glued to toothpicks. Cheap. Fast. Easy.
We had a photobooth! My dad had a soccer goal made out of pvc pipe so it was the perfect height and length for it. We pinned a few yards of red and white polka-dotted fabric to it, bought at a great little fabric store in Oxnard for $2 a yard, posted a "Photobooth" sign (downloaded from the pretty blog), and had some props ready--voila! To make the chalkboard talk bubbles, I used this how-to from Oh Happy Day!. I use Jordan's blog as a resource for everything, as you'll come to find out. I bought some chalkboard adhesive paper, stuck it to black foam board, and cut out shapes with an exacto-knife. I wish I had appointed someone else to take the pictures because it wasn't as successful as it could have been. I was running around doing a million other things and trying to enjoy the party,too! But it looked good!
The "Carnival" sign hung over the patio/dance floor. I designed it in Illustrator and printed it onto banner paper. I love the colors! So festive.
I love this tutorial by Dana from MADE for ruffled crepe paper garlands. I'm all for making inexpensive party decorations look like a million bucks! And I've used them for a few other events, so they were worth the time to make
I'll show how the tables looked in the next post, but basically it was a round table covered with a white tablecloth with a square navy-and-white-striped fabric table runner in the center. A square piece of burlap lay on top, and a red bucket full of peanuts and candy finished the rustic look.
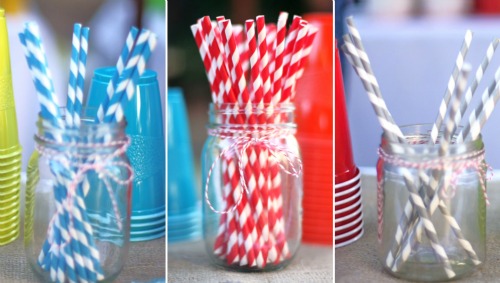
Stripey straws from Garnish!
A friend let us borrow an authentic popcorn machine which was manned by a few of Ruth's closest friends, and it was a big hit! They scooped the air-popped popcorn into cute little bags we made. I had wanted to do something similar to Oh Happy Day!'s purple picnic, but the white paper bags were too thick for my printer. I instead printed the design on white computer paper and cut/glued them on each bag. It was a labor of love.
More decorations: real and fake trees lined with twinkling lights and lots of colorful balloons.
I only have one picture of part of the candy/cupcake bar under the "tent." We set up a blue canopy in the middle of the yard and then hung long pieces of sheer fabric from each corner to the outer edges of the perimeter (found at the L.A. fabric district for $1 a yard) to mimic a colorful circus tent. It provided shade and dimension to the large grassy area where guests sat and visited while they ate.
Under the canopy we placed a round table and on top we set out jars and buckets filled with tootsie rolls, animal crackers, gumballs, twizzlers, sour straws, Dum-dums, puff mints, and the cupcakes.
I lucked out at a little party store in Oxnard and found inexpensive clear scalloped plastic cake stands to use for the cupcakes. I think they all cost less than $10 for two big stands. The tubes joining the tops to the bottoms were hollow, so I filled them with gumballs to make them more colorful. It's all in the details, right?
The only thing I never got a picture of was the food table. We had hot dogs and sweet and sour chicken skewers, fruit, chips, and salad. This is the only picture I got of the food:
At least the fruit looked good!
Part 2 coming soon with more pictures of the tables and guests!


2 comments:
This is such an awesome idea! Plus, Ruth looks gorgeous!
I love the Welcome to the Carnival signs & would love to have the file if you're willing to share!
Post a Comment